
Building an AI Chatbot for Microsoft Teams in Visual Studio

Overview
Ever since the AI craze began, one of my favorite use cases is the ability to leverage our favorite AI LLM to “chat” with our own proprietary data. As much as AI can give us anything we want from the pool of publicly available data, when it comes to our own data, we are still left doing things the old-fashioned way. This tutorial is a significant step in that direction.
The following steps outline getting a Microsoft Teams Chatbot up and running as simply as possible. The app will leverage Azure AI tools, let us put a personal touch on it, and allow us to build from there.
Visual Studio is ready to do much of the leg work for us. There are built-in templates for this kind of thing. I, however, ran into many roadblocks trying to follow the readme file. After much trial and error, I found the steps that I think are the most straightforward to get up and running. It does not follow the readme files exactly, but they may help you in your use case.
My goal is to have a part 2 of this tutorial, where we can personalize it for a business use case.
Prerequisites
Prior to following the steps below make sure you have
– An Azure Subscription where you have permission to create azure resources
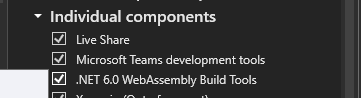
– Visual Studio with “Microsoft Teams Development Tools” included.
Part 1: Create a new Teams bot project

Step by Step:
- Open Visual Studio 2022
- Select “Create a new project”
- Search for “Teams” in the search box
- Select “Microsoft Teams App” template and click “Next”
- Name your project and choose a location, then click “Create”
- In the Teams Toolkit project creation wizard:
- Select “AI Chat Bot”
- Note: Your experience may differ in Visual Studio Professional or Enterprise 2022. If it prompts you to enter any keys, skip for now. We will add them later
Notes
This should create you a console application with the name you specified, and another “TeamsApp” project. This is a Microsoft 365 debugging tool. I found this tool to not be very helpful. It does not run locally. Luckily there are other ways we can test our console app without using it.
Feel free to poke around and explore before we move on, but there isn’t much we can do without some azure resources set up first, so we’ll do that next.
YML files
You’ll notice the teams app contains some .yml files. These are intended to create our azure resources for us. However, I wasn’t able to get these steps working without specific organization permissions. We will skip the Deployment via yml file in this tutorial, but there is information in the readme steps if you would like to give it a try.
Part 2: Bot Registration in Azure
- Create a Bot Registration in Azure
- Go to the Azure Portal
- Search for “Azure Bot” and create a new resource
- Give your Azure Bot a name and select a resource group
- Switch Pricing tier to “Free” plan. We don’t need standard for what we are building.
- Creation type should be “Create new Microsoft App ID”
- Click “Review and Create” and then “Create” once validation passes
- Generate a Client Secret
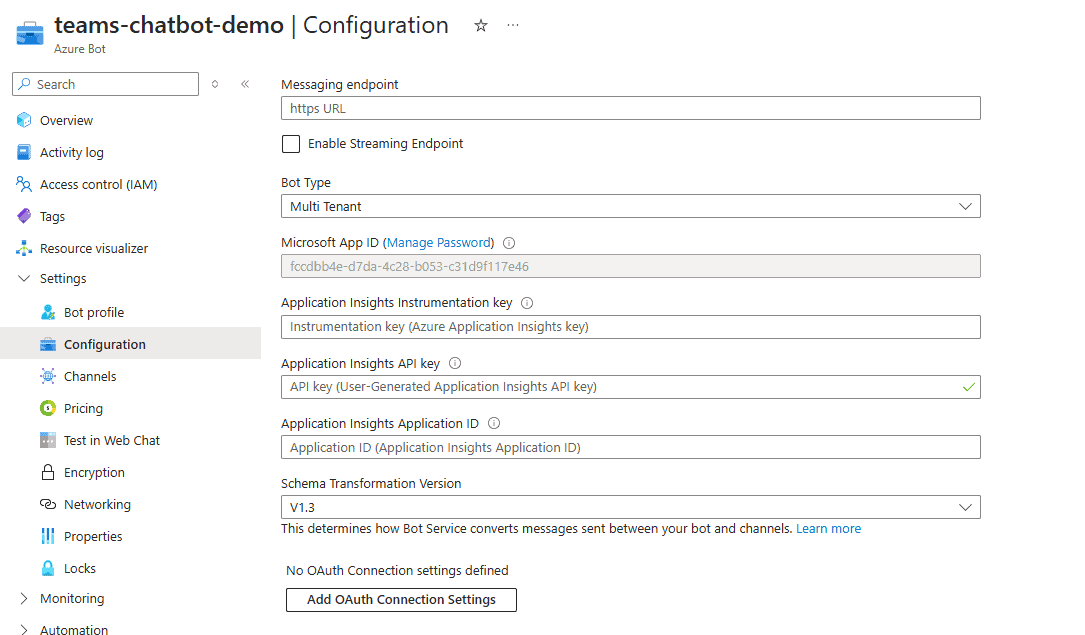
- Once your resource is done and ready to use, go to “Configuration” settings
- Click “Manage” next to Microsoft App ID
- In the Azure AD App Registration page, click “Certificates & secrets”
- The secret was created for us automatically, but we need to delete and create a new one to copy the Secret Value
- Create a new client secret with a description you will remember and Copy the Secret Value (not the Secret ID) immediately as it won’t be shown again
Notes
The Bot Registration is the key azure piece to get things working. If we were creating a simple “Echo” chatbot, this would be all we need.
Let’s copy our BOT_ID (which is also our TEAMS_APP_ID) and copy them into our VS project.
- Enter our values in our Teams app
- With our BOT_ID and BOT_PASSWORD (secret value), let’s update a few places on our teams app:
- In appSettings.json and appSettings.Development.json, let’s update BOT_ID and BOT_PASSWORD
- in our env.dev and env.local file, let’s set the BOT_ID variable and also set the TEAMS_APP_ID variable to the same BOT_ID guid.
- in our env.local.user and env.dev.user files, let’s set the Secret value in SECRET_BOT_PASSWORD
Part 3: Azure OpenAI Setup
- Create an Azure OpenAI Resource
- Go to the Azure Portal
- Search for “Azure OpenAI” and click “Create”
- NOTE: If you already have an OpenAI resource, you may be limited in creating another. You can try using the one you have already set up.
- Fill in the required information (resource group, region, name, pricing tier) with the default options
- Click “Review + create” and then “Create”
- Wait for deployment to complete (might take a moment)
- Deploy a Model
- Once your Azure OpenAI resource is created, navigate to it
- Click on “Explore Azure AI Foundry Portal”.
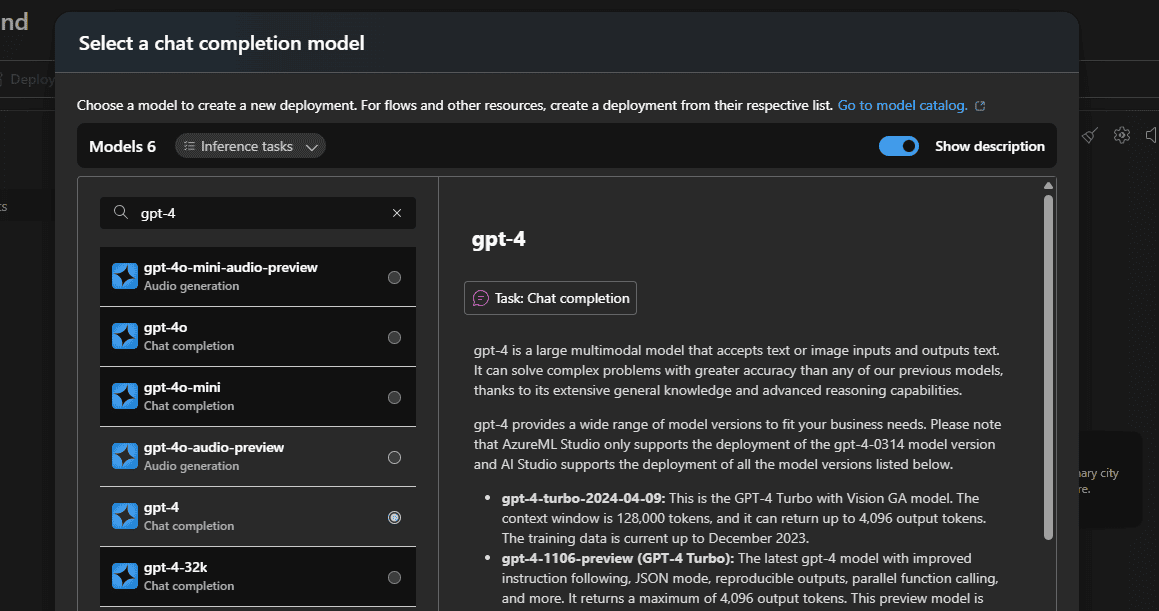
- In the Azure OpenAI Studio, go to “Chat” on the left menu
- Click “Create new deployment”, then From base models
- Select a model (like “gpt-35-turbo” or “gpt-4”)
- Give it a deployment name. We will need to use this in our teams chatbot application code
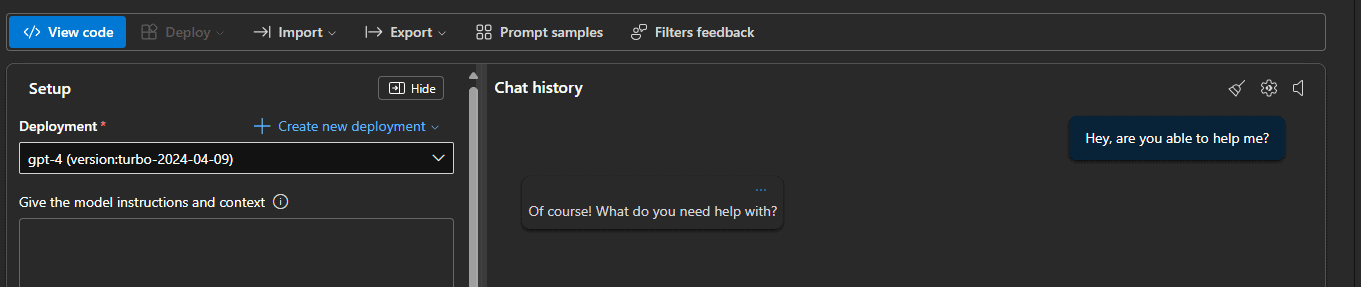
- Click “Create”
- When you see it listed in deployments, you should then be able to test it out in the Chat Window.
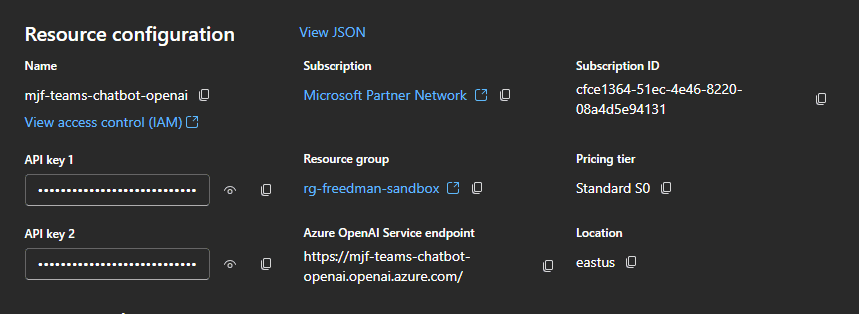
- Get OpenAI Configuration Details
- Staying in Azure AI Foundry. Select the “Home” button in top right
- On the welcome page, you should see a hidden API Key 1 and a Azure OpenAI Service endpoint
- Copy the following information that we will need to save into our teams application
- Endpoint URL (e.g., https://your-resource-name.openai.azure.com/)
- API Key 1 (Click copy icon)
- Deployment name (from the previous step)

- Update our Teams App
- Let’s update our appSettings.json and appSettings.development.json. Under Azure
- We should see OpenAIApiKey and OpenAIEndpoint. Let’s set those values.
- We should see similar environment variables, SECRET_AZURE_OPENAI_API_KEY and SECRET_AZURE_OPENAI_ENDPOINT under .env.local.user and .env.dev.user. Let’s set these values as well.
- We need to update some code in our Program.cs file. There is a built-in reference to a deployment model. let’s make sure this matches what we previously set up in step 3.
Part 4: Run Locally
Everything is in place to run locally! However, we are going to install some software so that we can run it outside of the Teams 365 app.
- Update our prompt
- We want to prove out that this is our code running and not just OpenAI default options. So lets update the skprompt.txt file under Prompts/chat folder in your console app
- Update the prompt to something that is very clear that the prompt is being utilized, such as asking it to speak spanish.

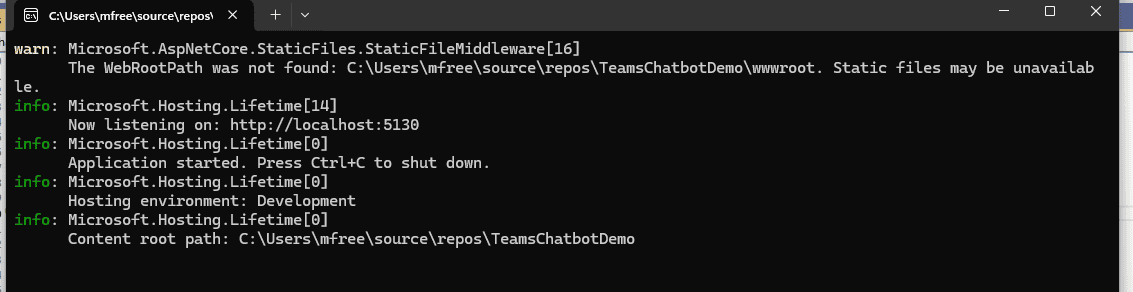
- Start your app
- Begin by starting your application (Not the TeamsApp, but the console app that matches your solution name)
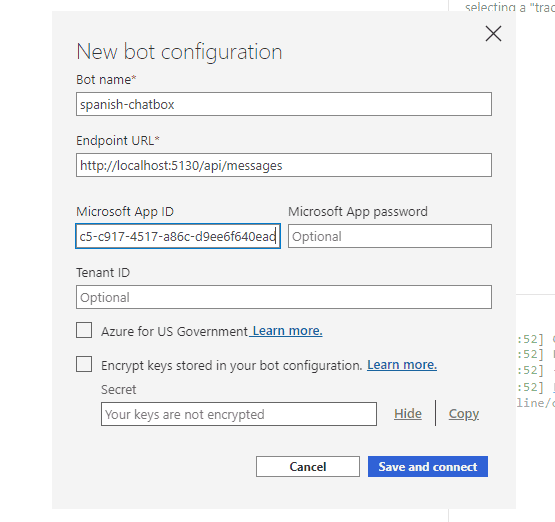
- Using Bot Framework Emulator
- Download and install Bot Framework Emulator
- Open the emulator and click “Open Bot”
- Enter your local bot URL:
http://localhost:5130/api/messages. you should see the localhost port that is set up in step 1 - Check “Use a Microsoft App ID and password for authentication”
- Enter your Bot’s Microsoft App ID and Client Secret Value
- Click “Connect”
- You should be able to enter a prompt in the Live Chat window, and get a response that is taking your prompt into effect!

Part 5: Running in Azure
If you got this far, you now have the app working remotely. You could choose to experiment here by changing pieces of code in the Program.cs file or on the OpenAI Resource. There are many things to experiment with. However our end goal is to get the app running in teams. For that we need it to run remotely.
- Update manifest.json
- Located in the appPackage folder
- Update the
idfield to match your Bot’s Microsoft App ID - Update the
botIdin thebotssection - One last thing is we need the Urls under developer to be urls that exist. Pick any url that suits you for this demo
- Create Web App From Visual Studio
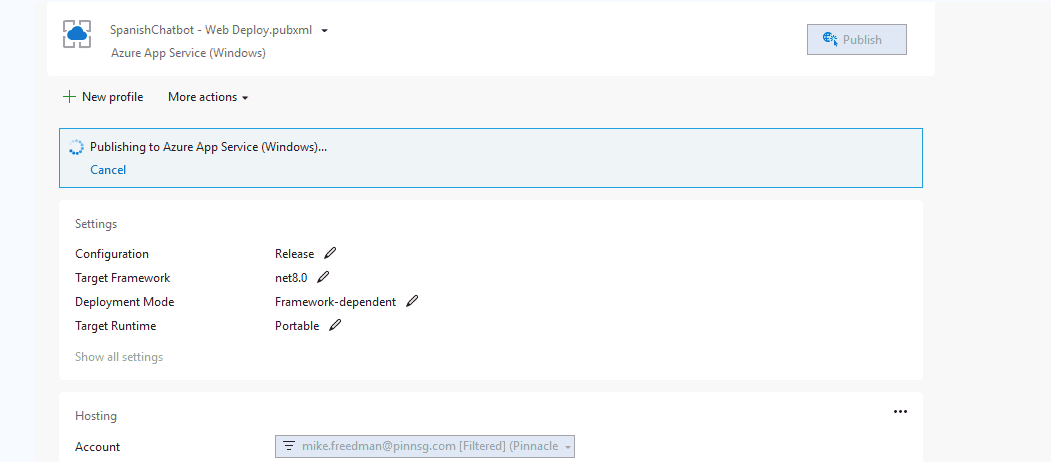
- Switching back to the console app project now. Click “Publish” in context menu.
- Create a web app using wizard after connecting to subscription
- Select Azure -> Azure App Service (Windows) -> Create New
- Give your app a name, and assign it to a resource group. Hosting plan will be created automatically
- Check Deploy as Zip Package
- After a few seconds of creating, there will be a Ready to publish page, with a publish button:
- Update Azure Bot Resource
- We need to update our Azure Bot Resource, but let’s first navigate to our Web App we just created. Take note of the default domain, it will end in (azurewebsites.net)
- Navigate to Azure Bot, and back to our Configuration section
- Put the website name (ex: https://spanishchatbot.azurewebsites.net/api/messages) in the Messaging endpoint
- Check Enable Streaming Endpoint. Then click Apply
- Right below the configuration section is Channels. Navigate there. Then Add “Microsoft Teams” as a channel from the list of available channels
- Navigate to “Test in Web Chat”. Here you should be able to type a message to your chat bot, and get a response back.

Part 6: Running our App in Microsoft Teams
We have our app running remotely, it’s now time to get it installed in Microsoft Teams.
The good news is this step is fairly straight forward. The bad news is that you will need to have special organization permissions to do it.
The permission necessary is “Custom App Upload”.
- Package our app
- Back in our VS Solution, let’s look at our manifest.json file again
- Double check step four in our manifest.json steps above. we need to make sure the urls there are real.
- Right click our “TeamsApp”, Under Teams Toolkit, select “Zip Package” and then select “for Azure”
- select our manifest file in the file explorer
- This will generate an appPackage.dev.zip file we can reference.
- Validate our App in Open Dev Portal
- navigate to https://dev.teams.microsoft.com/home
- Select “Import an App”
- Navigate to our packaged file we created in step 1
- This should open a dashboard for managing our teams app
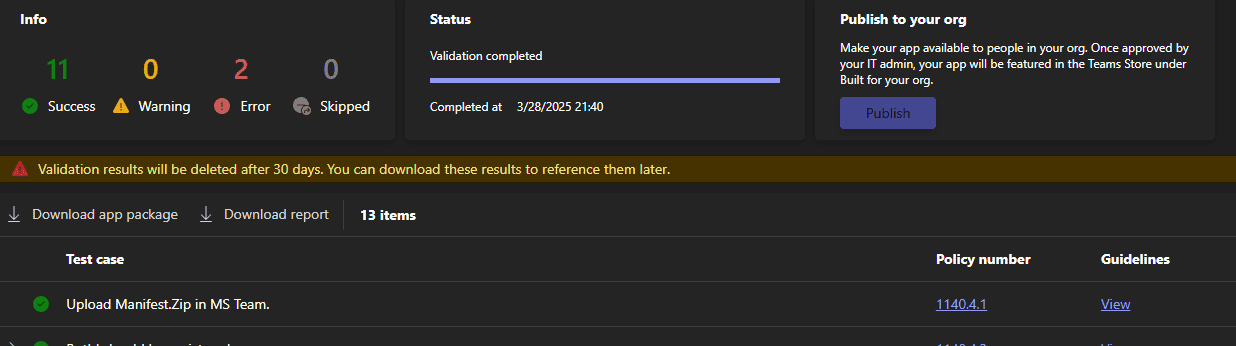
- In the left hand nav you should see “App Validation”. Select each of the check boxes to begin validation process.
- This is an important step because otherwise you will get an unhelpful “Something went wrong” error when you load into teams If you see errors, your app will not load. You will need to go back to your manifest file to correct them.

- Uploading into teams
- Under Apps, select Manage your apps
- You should see an Upload an App Option
- This is where you could upload your app or submit your app to your organization for approval.


Further Exploring
If you have made it to the end of the tutorial successfully, Congratulations! The work can now begin.
There are lots of places we can take our app. Below are some ideas of how you can customize the app for what you are looking for:
- Test out other prompts in your skprompt.txt file
- Try using AI Assistant rather than Action Planner
- “AI Assistant” has some ways to upload files to be considered in the chat, without incurring additional costs
- Set up Azure AI Search
– Azure AI Search is designed to load data sources you specify from other Azure Resources.
– Azure AI Search integrates with your Azure Open AI resource, so your app doesn’t need to change it’s code